How to set up LiteBlue MFA for your Employee ID
- Navigate to LiteBlue.USPS.Gov using a web browser on your computer or else click here. Please be aware that after logging into LiteBlue, you will have fifteen minutes to set up Liteblue MFA. You will be logged out after fifteen minutes and returned to the LiteBlue.
- Choose “Sign In”.
- Select Next after entering the Employee Identification Number (EIN).
- Select “Verify” and enter the password.
- Select “Verify” after entering the last four digits of your Social Security number. Only during the initial security method enrollment login will this step take place.
- . Under the first security method you want to use as your primary MFA security method, choose Set up. There are two or more security options available to users. After the method, you will be able to set up any number of additional security methods.
- You will return to the screen for setting up security methods once your primary security method has been configured. To set up an additional security method, select Set up.
- Choose “Finish.”
- You have successfully signed in to LiteBlue and configured your MFA security methods. You will be required to use the security method(s) that you configured the following time you sign in to LiteBlue.
How to configure the Phone (Voice) MFA security method
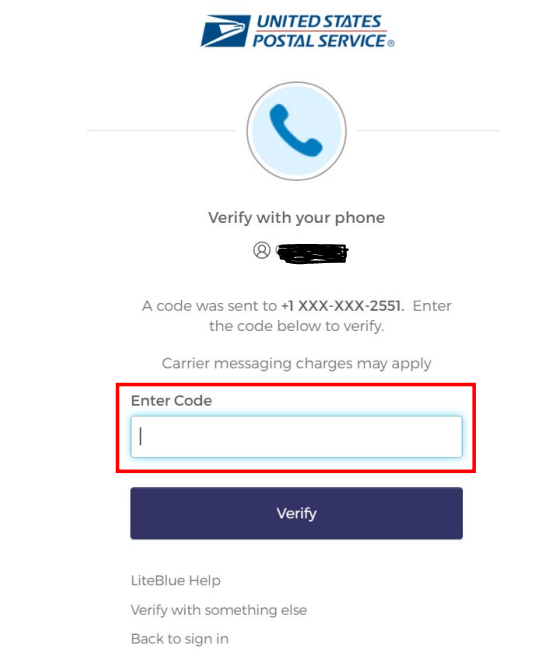
- To set up a voice call, go to Phone and choose Set up.
- Choose “Voice call”. Enter a phone number where you can make a voice call to get a verification code. After that, select Receive a voice call code.
- Enter the code, which is a six-digit numeric code, that was given to you by phone. Choose “Verify.” Your Voice Call security method has been successfully set up.
Configuring the Okta Verify MFA security method.
- On your mobile device: Based on the kind of mobile phone you have, choose the appropriate app store. Okta Verify installation and setup on an Android device may look different from the iPhone screenshots in this user guide. The procedure will be identical.
- In the app store on your phone, look for Okta Verify.
- Select and install the Okta Verify app on your phone.
- Inspection of the installation. Choose “OK”.
- You can now access the Okta Verify app from your home screen. To continue the setup, select the application.
- Select Start Here.
- Choose Next.
- Choose “Add Account”.
- Choose an organization.
- Select “Yes” to start the scan.
- Select OK to grant Okta Verify access to your camera.
- To set up an additional security method, go to Okta Verify and select Set up.
- Scan the browser’s QR code with your phone’s Okta Verify app.
- To confirm, select Allow for the Push Notifications option. Push Notifications is the security option of choice.
- Select OK to enable Face ID (it’s not necessary). Okta Verify includes a Face ID security feature as well. You can select Don’t Allow if you don’t like using Face ID. Okta Verify can still be used as an MFA security method.
- On the Account Added screen, select “Done.”
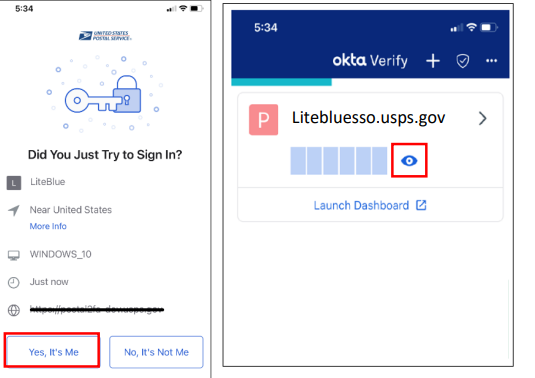
- You should get the Push Notification on your phone. Choose “Yes, It’s Me.” Select the eye icon to reveal a six-digit passcode to access the system in the event that you did not consent to the Push Notification.
- You will receive Push Notification confirmation on your phone. Your Okta Verify security method has been successfully set up.
How to set up the MFA security method for Google Authenticator LiteBlue USPS
- On your mobile device: Based on the kind of mobile phone you have, choose the appropriate app store. Google Authenticator installation and configuration on an Android device may look different from the iPhone screenshots in this user guide. The procedure will be identical.
- Find Google Authenticator by searching the appropriate app store.
- Select and install the Google Authenticator app on your phone.
- Inspection of the installation. Choose “OK”.
- You can now access the Google Authenticator app from your home screen. To continue the setup, select the app.
- Select Start Here.
- Scan a QR Code will appear.
- Select OK to allow the Authenticator access to your camera.
- To set up this security method, go to Google Authenticator and select Set up.
- Scan the browser’s QR code with your phone’s Google Authenticator app.
- The Google Authenticator app will start generating a six-digit verification code on your phone.
- Select Verify on your computer after entering the phone-generated code. The Google Authenticator app setup has been completed successfully.
Read also: USPS Direct Depoist Priority Mail USPS Hold Mail LiteBlue eRetire LiteBlue USPS Virtual Timecard Liteblue Login USPS Find Missing Mail USPS Change of address SSP.USPS.Gov